PAYHIP GUIDE
日本語 / English
What Is Payhip? Why I Chose It and How to Connect Stripe
I chose Payhip to try selling individual English articles online. This guide explains what Payhip does, how it compared with Patreon and Gumroad for my needs, and how to get from registration to connecting Stripe.
I am based in Japan and connected an existing Japanese Stripe account. Account requirements vary by country. Product creation and Japan-specific payment troubleshooting are covered in separate guides linked below.
What is Payhip?
Payhip lets creators build a storefront and sell digital downloads, courses, memberships and other products. It is more than an article-publishing platform: you prepare a listing and decide what buyers receive after purchase.
For readers familiar with Japanese services, its role overlaps with the paid-content side of note and the storefront side of BASE or STORES. That is an analogy, not a claim that their features or audiences are identical.
Payhip, Gumroad or Patreon?
I discussed these three options with ChatGPT. I did not register and run sales tests on all three. My requirements were a one-time article purchase and online reading after payment; I did not need a subscription or a PDF.
| Service | Relevant features | Fees to check |
|---|---|---|
| Patreon | One-time purchases of posts, digital products and collections, as well as memberships. | The current standard platform plan charges 10%, with processing and other applicable fees. |
| Gumroad | Digital products, ebooks and courses without a monthly subscription fee. | 10% + $0.50 for direct sales; 30% for Discover marketplace sales. |
| Payhip | Digital Products with an editable post-purchase page; a free monthly plan is available. | Free Forever: $0 per month plus 5% per transaction. Payment-processor fees are separate. |
Fees checked November 21, 2026. These are not identical fee categories: payment method, currency, sales channel and account terms can affect what you receive. Check the official pricing pages before choosing.
Why I started with Payhip
Payhip’s Digital Product option and Beta content editor suited the format I wanted: one article, bought once and read online after purchase. The free monthly plan also suited a small experiment.
I did not conclude that the alternatives could not do this. Payhip was simply the option I chose to try first.
From registration to a Stripe connection
1. Create a seller account
Start at Payhip’s official website, open the registration form and follow its prompts. After registration, open the seller dashboard. This is separate from the storefront customers visit.
2. Check your store settings
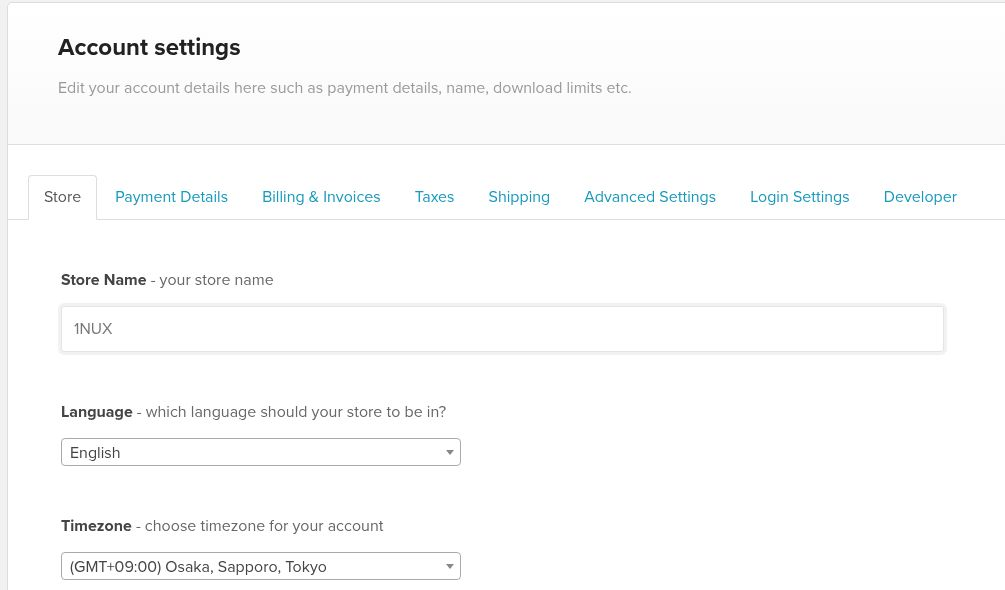
Open Account → Settings → Store. Check Store Name, Language and Timezone. My store is named 1NUX, its language is English, and its timezone is Osaka, Sapporo, Tokyo. Selling in English does not require changing the store’s timezone to another country.
If you change settings, use Save settings at the bottom of the page.
3. Open Payment Details and connect Stripe
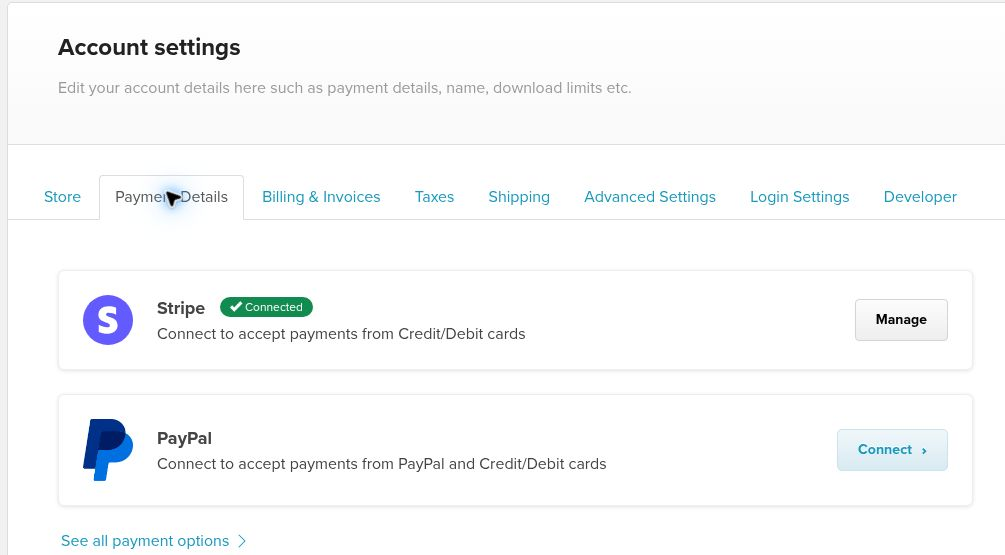
From Settings, open Payment Details. If Stripe is not connected, choose Connect, follow the Stripe prompts, check which account you are connecting and authorize access. Existing accounts and new accounts can follow different paths. I used an existing account.
After connecting, Payhip shows Connected and Manage, as in my screenshot. If yours is already connected, there is no need to disconnect it to repeat these steps.
4. Check Stripe’s outstanding requirements
Once Payhip shows Connected, check Stripe itself for identity verification, requests for additional information or review notices. Follow the requirements shown for your own account. A successful connection alone does not establish that live payments are enabled.
The store-settings and connected-state screenshots were captured November 21, 2026. I did not repeat registration or Stripe authorization for this guide; those steps follow Payhip’s official instructions. Screens and requirements may vary.
If Stripe is connected but live payments are not enabled
This happened with my Japanese account, and the activation issue has since been resolved. The detailed explanation belongs in my Japan security-checklist troubleshooting guide, including the controls I clarified with Payhip support. Do not assume Japan’s declaration applies to every seller worldwide.
Next: create the product
Once you have checked the connection and remaining requirements, continue to turning an English article into a Payhip Digital Product. That guide covers the listing, post-purchase article, price, visibility and public page.
Official references
- Payhip features
- Payhip pricing
- Gumroad pricing
- One-time purchases on Patreon
- Patreon fees
- Connect a Stripe account
- Payhip content editor
Official information checked November 21, 2026.
Found this helpful?
You can leave a small tip to support 1NUX.
Tips are optional. This guide stays free to read.
Payments are processed by codoc in Japanese yen (JPY).